Common Controls
Before you start, it's worth familiarizing yourself with some of the common controls used throughout NanoStudio.
It's also worth experimenting by double tapping on controls you find throughout the app. Often, shortcuts are available which are not essential to using the app but will speed up your workflow once discovered.
Quick links:
Standard Controls
|
|
|
 |
|
KNOBS
You may choose between Vertical or Rotary control modes and set the control sensitivity for knobs in the UI Settings. The Vertical mode is the default and recommended setting.
VERTICAL - Drag up or down to change value.
ROTARY - Drag in a circular motion to change value.
DOUBLE TAP - Reset to default value. |
 |
|
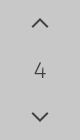
SPIN BUTTONS
DRAG the number up or down to make coarse changes.
TAP THE BUTTONS to make fine adjustments. |
 |
|
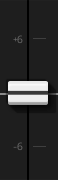
SLIDERS
DRAG up or down to make coarse changes.
TAP on the space above or below the handle to make fine adjustments.
DOUBLE TAP on the handle to reset to its default value. |
 |
|
TAP AND HOLD
If you see a button or title with a small triangle icon in its corner, this indicates that you can TAP AND HOLD the button for extra options. |
 |
|
DRAG HANDLES
Drag handles are used in editors for making fine adjustments to selections.
RECTANGULAR DRAG HANDLES - DRAG to change.
SQUARE DRAG HANDLES - TAP to make a single step change. |
 |
|
SCROLLBARS
Scrollbars are used in editors for making adjustments to a view's axis.
DRAG on the handle to move it.
TAP on the space outside the handle to move in smaller steps.
DOUBLE TAP on the handle to toggle between minimum and maximum zoom. |
 |
|
HAMBURGER BUTTONS
Buttons with an icon depicting 3 horizontal lines are referred to (in some parts anyway) as hamburger buttons. Hamburger buttons typically appear in the top right corner of a page or panel. When tapped, they invoke a dropdown menu containing functions which would otherwise clutter the main view. Whenever you see one, it's worth giving it a tap to see what's on offer. |
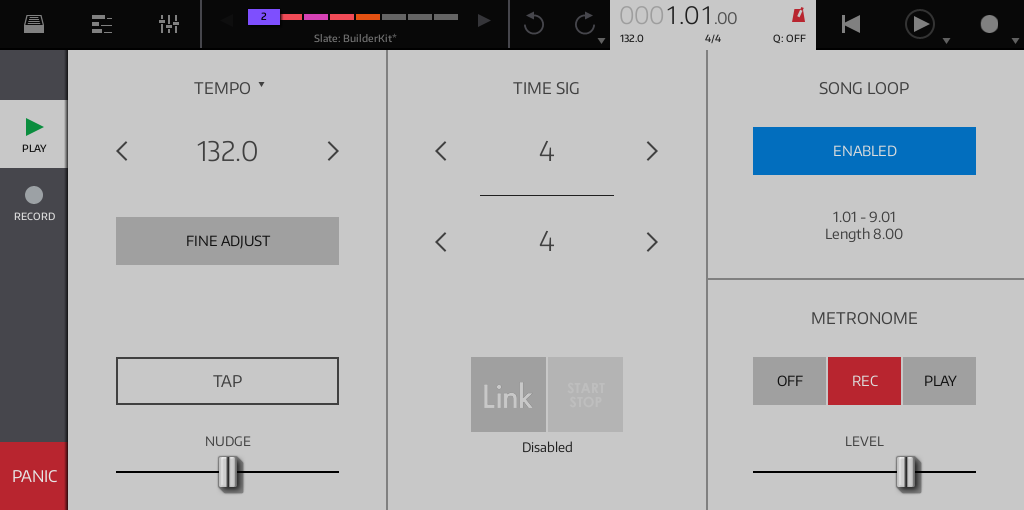
Status Bar
The status bar is shown in nearly every view. Its purpose is to navigate the main pages of the app, show important status information and provide quick access to commonly used options and settings.

|
|
|
HOME
 |
|
Use the home page to organize your projects and files. You can also use it to set up global preferences or purchase extra content from within the app. |
SONG EDITOR
 |
|
Use the Song Editor to arrange and edit your song. You can also use it to add, remove or rearrange tracks and create track groups. |
MIXER
 |
|
Use the Mixer to balance the levels of each track in your song. You can also use it to add, remove or rearrange tracks and instruments, manage insert effects and set up send/return routings between tracks. |
INSTRUMENTS
 |
|
Shows the currently selected instrument.
TAP to select.
TAP WHEN SELECTED to show the Instrument Dropdown.
TAP LEFT/RIGHT ARROWS to move to the previous or next instrument.
DRAG LEFT/RIGHT to quickly move to a different instrument. |
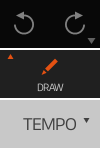
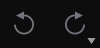
UNDO/REDO
 |
|
Most operations can be undone or redone.
TAP AND HOLD to show the complete list of operations currently held in the history buffer. |
SONG POSITION INDICATOR
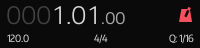 |
|
Indicates the transport's current position, tempo and time signature and metronome mode.
Song position text:
TAP to show the Song Settings Dropdown.
DOUBLE TAP to toggle between bars/beats or minutes/seconds representation.
Metronome icon:
DOUBLE TAP to toggle metronome modes. |
STOP/LOCATE
 |
|
Stops the sequencer when playing or recording.
When the sequencer is stopped:
TAP locates the transport to the start of the current loop.
DOUBLE TAP locates the transport to the start of the song. |
PLAY
 |
|
Starts the sequencer in play mode. When loop mode is enabled, the circular icon indicates the current position in the loop section.
TAP AND HOLD to show the PLAY Settings. |
RECORD
 |
|
Starts the sequencer in record mode.
TAP AND HOLD to show the RECORD Settings. |
Instrument Dropdown
The instrument dropdown is invoked by tapping on the status bar's instrument area when it is already selected. From here you can select, adjust the volume and mute/solo all of the instruments currently used in your project.

|
|
|
| SIMPLE |
|
A simple view of the instruments with an output level meter. TAP on an item to select that instrument. |
| MUTE/SOLO |
|
Mute/solo options and buttons to jump to the mixer or sequencer track belonging to the instrument. TAP on the instrument's name to select that instrument. |
| VOLUME |
|
Volume control for each instrument. TAP on the instrument's name to select that instrument. |
Song Settings Dropdown
The song settings dropdown is invoked by tapping on the status bar's song position indicator. Alternatively, it may be accessed with a TAP AND HOLD on the status bar's PLAY / RECORD BUTTONS.
The settings are split between pages and are selected by tapping on the large tab buttons on the left side of the dropdown.
The PANIC BUTTON is shown on all pages. This is used to forcibly stop all currently playing notes and send 'note off' messages to external MIDI devices and plugins, in the rare cases where a 'hanging note' occurs.
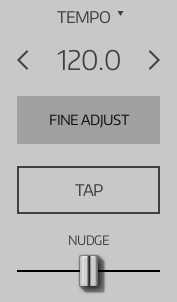
PLAY Settings
This page of the song settings dropdown contains the most commonly used controls for song playback. You can use it to set the song's tempo, time signature and loop enable and control how the metronome behaves.
|
|
|
 |
|
There are many methods available for setting the tempo.
TAP ON THE TITLE to enter a precise value via the numeric keypad dropdown.
To make coarse changes, DRAG THE NUMBER up or down.
To make fine changes, TAP ON THE LEFT / RIGHT buttons. You can enable FINE ADJUST to reduce the value increment from 1 BPM to 0.1 BPM.
The TAP BUTTON allows you to set the tempo by tapping in time to the music.
The NUDGE SLIDER temporarily slows down or speeds up the tempo before returning it to its current value. This is useful for syncing with an external source when you already have the correct tempo. |
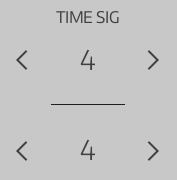 |
|
Sets the song's time signature.
To make coarse changes, DRAG THE NUMBER up or down.
To make fine changes, TAP ON THE LEFT / RIGHT buttons. |
 |
|
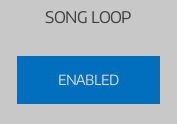
Enables song looping.
The song loop points may be set in the Song Editor by dragging on the time ribbon. |
 |
|
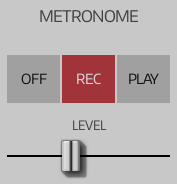
OFF disables the metronome completely.
REC enables the metronome only when recording.
PLAY enables the metronome when playing or recording.
NOTE: When enabled, the metronome will play during the count-in and continue to play thereafter. If you only want it to play during the count-in, this behaviour can be changed in the Settings Page. |
 |
|
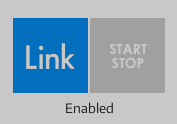
Enables or disables Ableton Link, which allows you to sync NanoStudio's beat and tempo with other Link enabled apps.
Enable the START/STOP BUTTON to sync the transport start/stop state in addition to beat and tempo. |
RECORD Settings
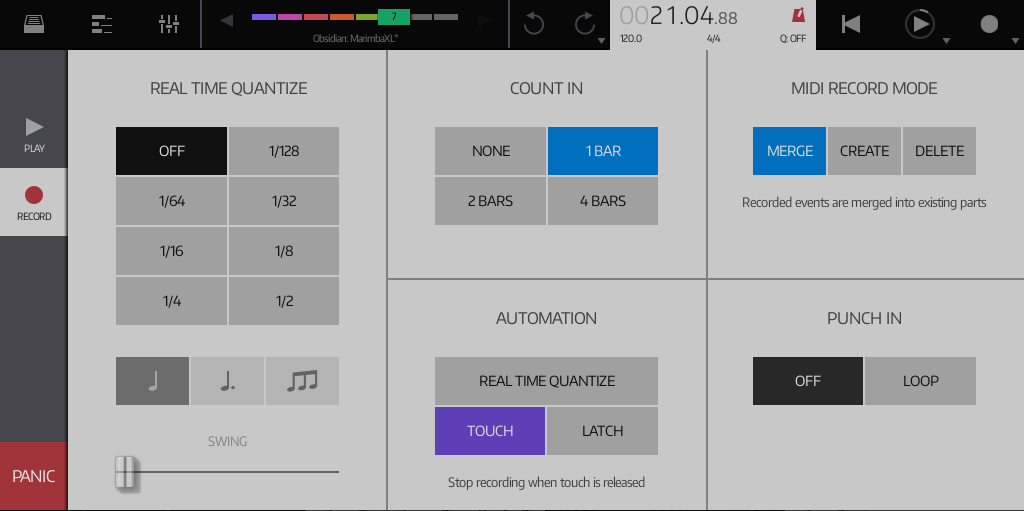
This page of the song settings dropdown contains the most commonly used controls for song recording. You can use it to set real-time quantize, record count-in and punch-in and control how automation and MIDI events are recorded.
|
|
|
| REAL TIME QUANTIZE |
|
Sets the quantize interval used when recording a performance in real-time.
Choose OFF to disable automation quantizing when real-time recording. You can always quantize your performance later using the Part Editor, which has more powerful quantize features. |
| COUNT IN |
|
Sets the length of the record count-in.
Choose OFF to disable the count-in. When disabled, recording starts as soon as the record button is tapped. |
| MIDI RECORD MODE |
|
Determines how MIDI notes and controller events are handled when recording a performance in real-time.
MERGE - The sequencer will attempt to merge recorded events into an existing part if one is found at the current song position. If no part is found, a new one will be created.
CREATE - The sequencer will always create a new part for any events recorded during the current recording session.
DELETE - Any notes you hold down or controllers you move whilst recording will be deleted from the sequence rather than added. |
| AUTOMATION |
|
Determines how automation and MIDI controller events are handled when recording a performance in real-time.
REAL TIME QUANTIZE - When enabled, automation events will be quantized in the same manner as note events (according to the real time quantize settings).
TOUCH - When an automation control is released, the sequencer will stop recording that controller.
LATCH - When an automation control is released, the sequencer will continue to record that controller's last value. |
| PUNCH IN |
|
When enabled, the sequencer will only record when the song position is within the song loop section. |
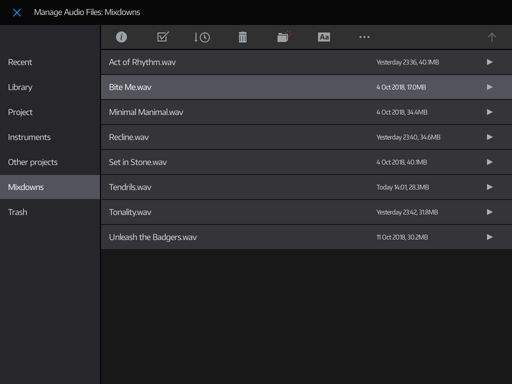
File Browser
The file browser is used throughout the app for dealing with file-related operations. It's not just for loading or saving - you can use it to rename, copy, move, import and export files, create new folders
and show info about your files. It also supports multiple selection, so it's easy to perform bulk operations.
NOTE: If the current project is among the selected files, the operations described above will not be available. This is because the active project needs access to files inside its own folder
at all times and would not respond well if those files were moved or changed. If you need to perform file operations on the current project then you must first unload it.
|
|
 |
The file browser has an info pane which you can hide and reveal using these buttons:
 |
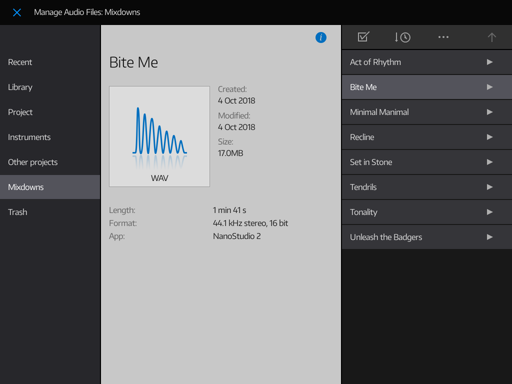 |
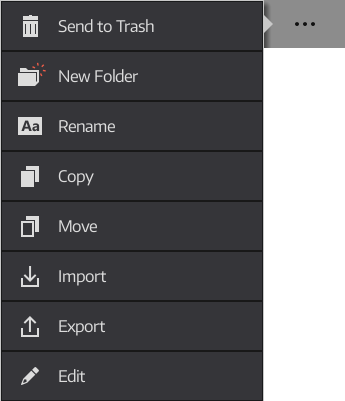
The info pane shows properties related to the current selection and provides help about the current folder if there is no selection. If the info pane is open then the file browser has less room for buttons and you may instead access all file commands via the command dropdown button:
 |
|
|
|
 |
|
Use the command dropdown to perform operations on the current file selection.
NOTE: These operations are not available if the active project is included in the current selection.
Import and Export allow you to get files in and out of the app via a variety of different methods. Multiple files are usually zipped into a single file before they are exported. See Integration and Sharing for more details.
Edit may be used to open the Sample Editor when an audio file is selected. |
 |
|
Enables multiple file selection. |
 |
|
By default, the file browser sorts the list alphanumerically. Enable this button to sort the list according to the file's time and date. |